Custom MQTT device
Custom MQTT devices are devices from third parties that are not officially supported by Avelon out of the box. They can still be integrated, but they require additional configuration before the system is able to parse its messages.
Click on the desired MQTT device in the device list to go to its configuration page. All relevant information about the device is displayed there.
Create a custom MQTT device
If you want to integrate a new device, click on Add Device in the toolbar above the device list. Select the device type “My MQTT Device” and provide the required information:
- Serial Number
The serial number that uniquely identifies the physical device. This is typically the serial number that is printed on the device itself. If the device transmits its serial number via MQTT, the system will automatically update the serial number accordingly, once it receives messages from the device.
Note
In order to create a custom MQTT device, your user role needs to have the action right “Create and delete devices”.
Users with the action right “Show all devices” can see all devices of the client. Users without this action right, on the other hand, can only see devices which have at least one user group assigned that they’re part of. Therefore, those users have to assign at least one of their user groups under Device Access when adding a device, so that they will be able to see the device afterwards.
Also see Device access below for more information.
IoT Profile
For the system to be able to parse incoming messages from the custom MQTT device, you’ll also need to select an IoT profile.
This will set up a message decoder for the device, and it will also create the necessary data points.
You can find more information about IoT profiles in the section IoT profiles.
General
- Serial Number
The serial number that uniquely identifies the physical device. This is typically the serial number that is printed on the device itself. If the device transmits its serial number via MQTT, the system will automatically update the serial number accordingly, once it receives messages from the device.
- Activation Date
The date when the system first received a message from the device.
- Last Connection
The date when the system last received a message from the device.
- Allow access to this device in the public web app without login
If you want to use the QR code on the device to quickly access its measurements, keep this option enabled. However, this will make the device accessible on iot.avelon.cloud to anyone who has access to the QR code. If you deactivate the option, the device and its measurements can only be accessed when you’re logged in. You can change this setting at any time.
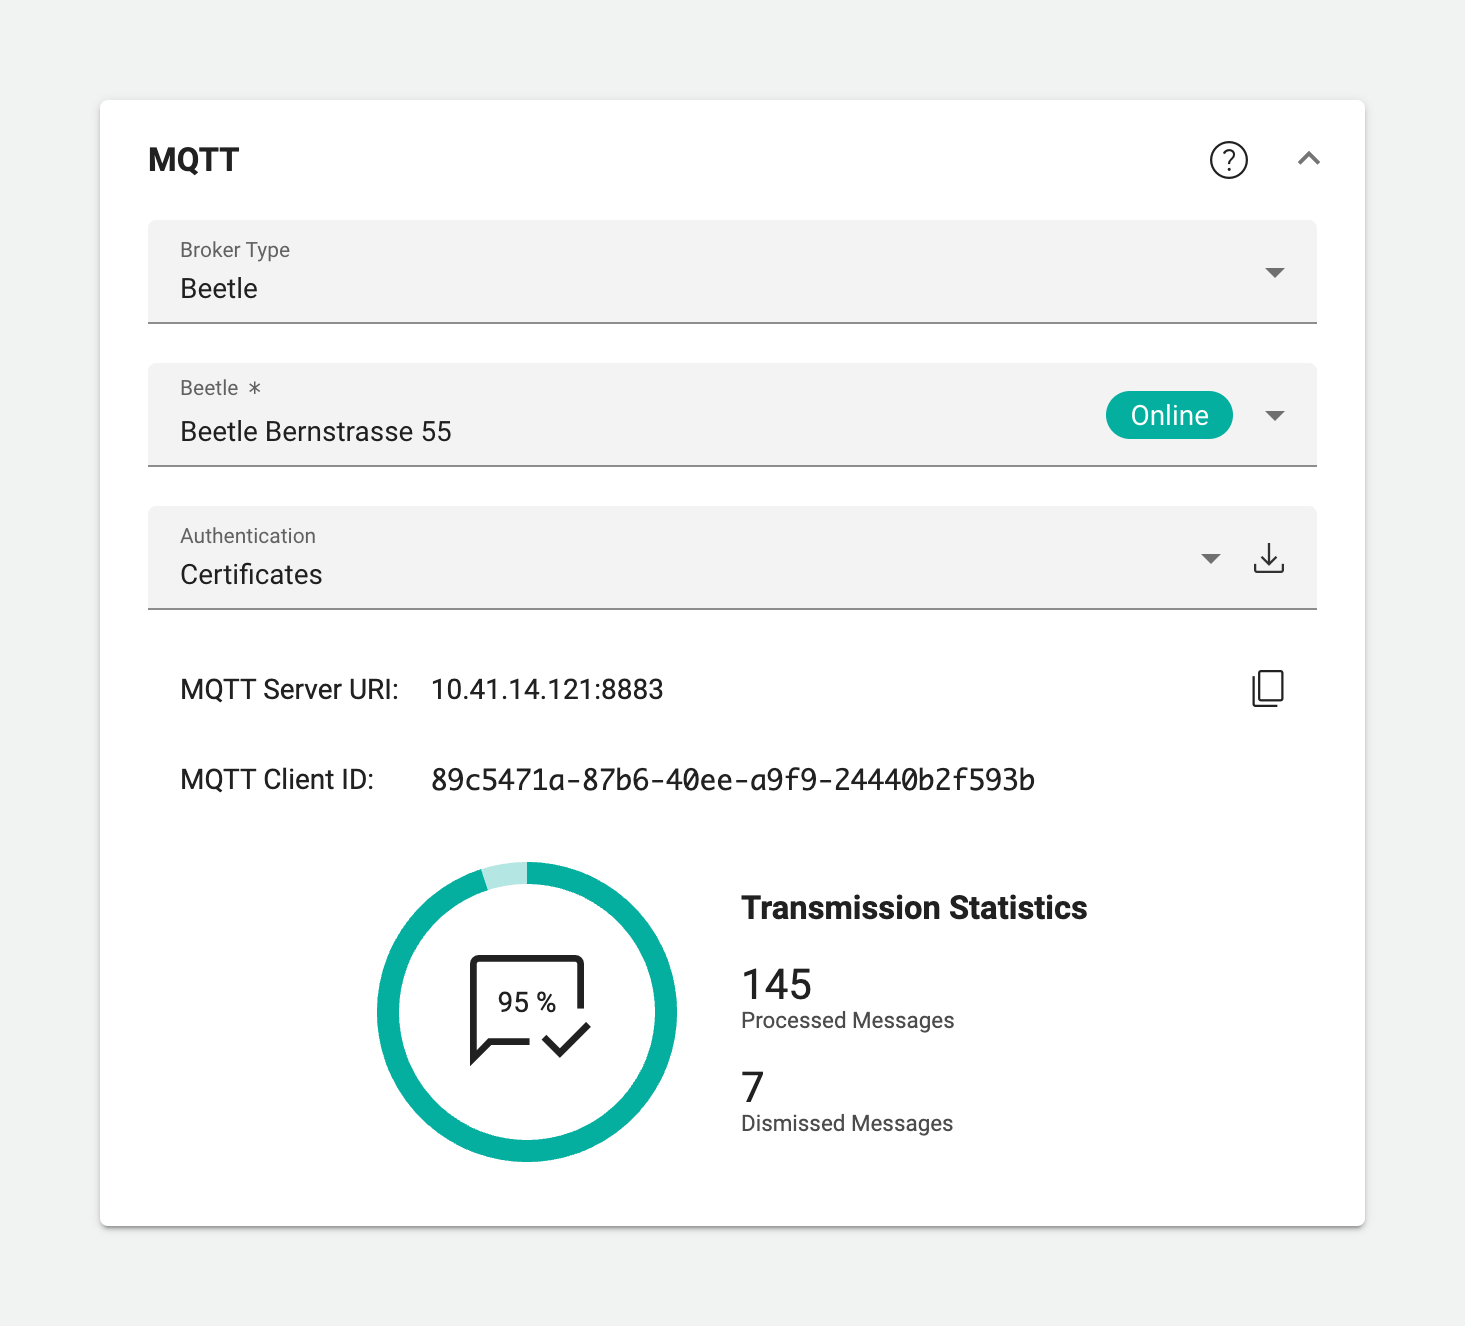
MQTT
On this card you can configure the broker that is used by the device to send MQTT messages. Once the device starts sending messages, you can see the number of messages that were received and processed by the system at the bottom of the card.
- Broker Type
- Internal Broker
Choose this to use the default MQTT broker provided by the system.
- Authentication
Select the desired authentication method.
- Password
The device authenticates itself to the broker with username and password. The username is equal to the Client ID above. The password can be obtained by clicking on Download MQTT Client ID / Credentials. Note that doing so will always generate a new password and invalidate the current password.
Configure the username and password on the configuration interface of your MQTT device by entering these values. Note that in addition to the password, the downloaded file also contains a certificate that is used by the device to communicate with the broker and has to be uploaded to the MQTT device.
- Certificates
The device authenticates itself to the broker with client certificates. The client certificates can be obtained by clicking on Download MQTT Client ID / Certificates. Upload the certificates on the configuration interface of your MQTT device.
- MQTT Server URI
The URI of the internal MQTT broker. Set this URI on the configuration interface of your MQTT device. If you selected the Password authentication method, the port is 8882. If you selected the Certificates authentication method, the port is 8883.
- Download MQTT Client ID / Credentials / Certificates
Click on this button to download the login credentials or certificates, depending on your selected authentication method. This button is only available until the device is able to communicate with the internal MQTT broker, to prevent you from accidentally creating new login credentials or certificates during operation.
Note
When publishing messages to our internal MQTT broker, make sure to prefix the topic with the client ID, e.g.
<client-id>/mytopic, so that the message is sent to the correct device.You can test the connection to our internal broker by publishing messages with a local MQTT client like MQTT Explorer. Note that the application must be able to establish a TCP connection to the broker. Most web-based MQTT clients use WebSockets, which are not supported by our internal MQTT broker.
- External Broker
Choose this to use an external MQTT broker from a 3rd-party provider.
- Broker Connection
Select the desired broker connection from the list. If you want to add a new broker connection or edit an existing one, click on the Manage Broker Connections icon next to it.
- Beetle
- Beetle
Select the Beetle that you want to use as MQTT broker for this device.
Note that Beetles are only available in this dropdown if they satisfy all of the following conditions:
The Beetle is online.
The Beetle has an “MQTT Broker” license.
The Beetle is running on the latest operating system. If you log in to the Beetle user interface and you see a yellow warning at the top of the page that says “This device is running an outdated software”, it means that the Beetle is running an older operating system. Please contact Avelon Support to request a system update.
- Authentication
Select the desired authentication method.
- Password
The device authenticates itself to the broker with username and password. The username is equal to the Client ID above. The password can be obtained by clicking on Download MQTT Client ID / Credentials. Note that doing so will always generate a new password and invalidate the current password.
Configure the username and password on the configuration interface of your MQTT device by entering these values. Note that in addition to the password, the downloaded file also contains a certificate that is used by the device to communicate with the broker and has to be uploaded to the MQTT device.
- Certificates
The device authenticates itself to the broker with client certificates. The client certificates can be obtained by clicking on Download MQTT Client ID / Certificates. Upload the certificates on the configuration interface of your MQTT device.
- User-Defined Topic
By default, messages have to be published with a topic that is prefixed with the MQTT client ID for the MQTT broker to accept and process them (see MQTT Client ID below). The topic usually has to be configured on the configuration interface of the MQTT device itself, so make sure to set it there accordingly and leave this field empty.
However, if your MQTT device sends messages with a hard-coded topic that cannot be changed, you can paste it here. This will override the default behavior, and only messages with this static topic will be accepted by the broker, regardless of the MQTT client ID.
Note that this topic must be unique per broker, meaning that two different MQTT devices cannot use the same topic when they are using the same broker.
- MQTT Server URI
The URI of the MQTT broker on the Beetle. Set this URI on the configuration interface of your MQTT device. If you selected the Password authentication method, the port is 8882. If you selected the Certificates authentication method, the port is 8883.
- Download MQTT Client ID / Credentials / Certificates
Click on this button to download the login credentials or certificates, depending on your selected authentication method. This button is only available until the device is able to communicate with the MQTT broker on the Beetle, to prevent you from accidentally creating new login credentials or certificates during operation.
You can test the connection to the MQTT broker on the Beetle by publishing messages with a local MQTT client like MQTT Explorer. Note that the application must be able to establish a TCP connection to the broker. Most web-based MQTT clients use WebSockets, which are not supported by the MQTT broker on the Beetle.
- MQTT Client ID
If you’ve chosen to connect to the internal broker or a Beetle broker, you’ll see the client ID with which the device needs to identify itself to the MQTT broker. This ID is generated automatically when the MQTT device is created, and you’ll also need to set this client ID manually on the configuration interface of your MQTT device.
Note
When publishing messages to an internal MQTT broker or a Beetle broker, make sure to prefix the topic with the client ID on the configuration interface of your MQTT device (e.g.
<client-id>/mytopic), so that the message is accepted and processed by the broker correctly.If you cannot freely configure the topic on your MQTT device, you can alternatively copy the hard-coded topic from your MQTT device to the input field User-Defined Topic above.
Also note that the username is identical to the client ID if the device authenticates itself to the internal broker with username and password.
- Transmission Statistics
This section displays the transmission statistics for the received MQTT messages. On the right, you can see the number of messages that have been successfully processed, as well as the number of messages that have been dropped due to the violation of our MQTT restrictions. The number inside the circle shows the fraction of successfully processed messages in relation to the total number of received messages.
Manage external MQTT broker connections
You can configure connections to external MQTT brokers in this dialog. You need to create at least one connection for every external MQTT broker you want to use, but you can create multiple connections if you want to use different authentication credentials for the same broker.
Note that the action right “Edit MQTT broker connections” is required in order to manage broker connections.
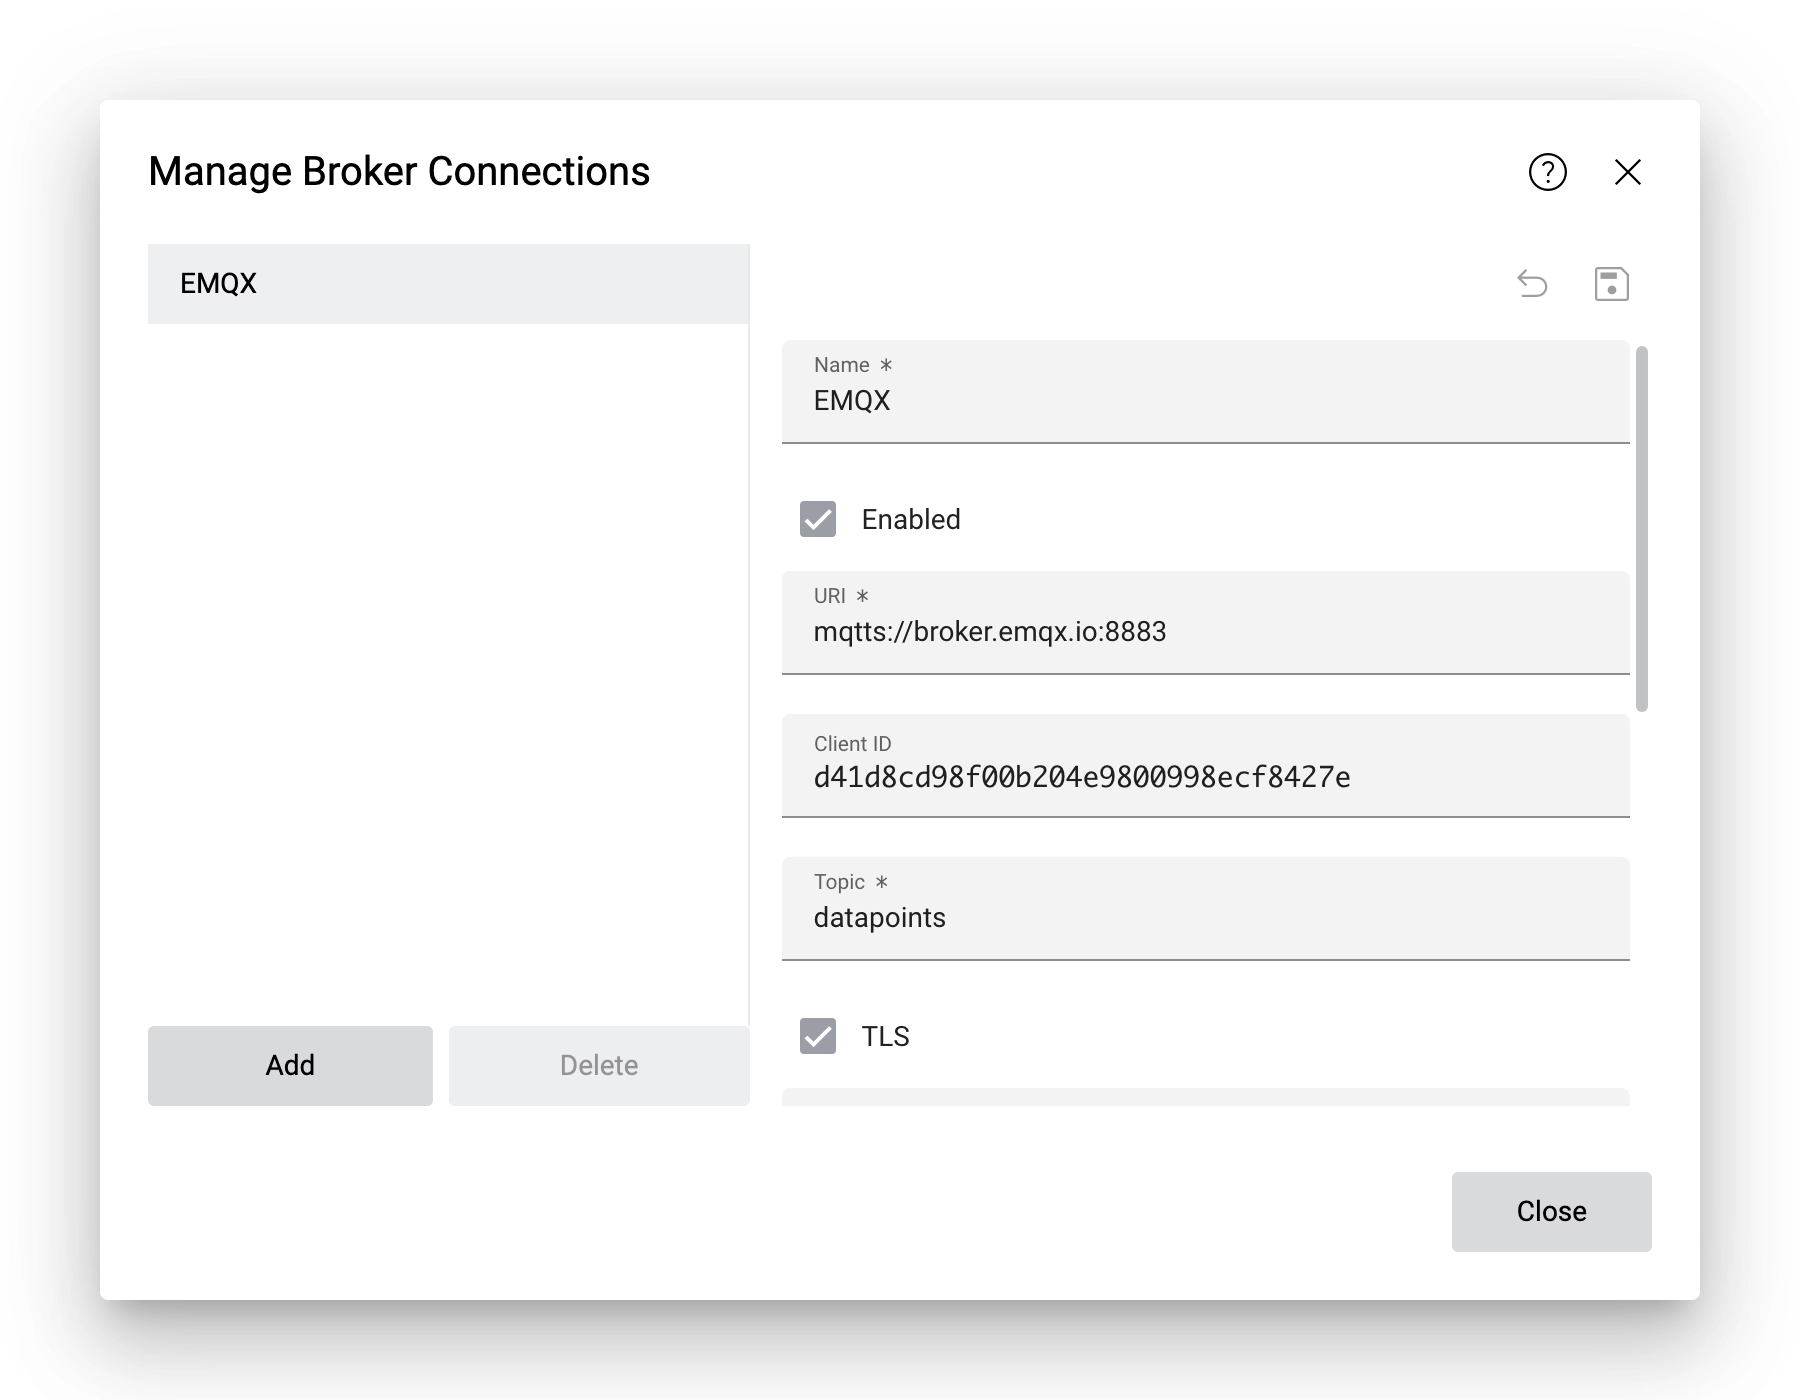
- Name
Enter a new name for the broker connection so that you can identify it more easily later.
- Enabled
Use this option to enable or disable the connection to the broker.
- URI
Enter the full URI to the broker, including the protocol, the hostname and the port, e.g.
tls://broker.example.com:8883.- Client ID
The MQTT client ID that the system uses to subscribe to the external MQTT broker. You can use this ID in order to whitelist subscriptions from Avelon on the external MQTT broker if necessary.
- Topic
This field is mandatory and must not be empty or set to
#, as subscribing to all topics is not allowed. Enter the specific topic to which the system should subscribe on the external MQTT broker.- TLS
Enable this checkbox if the connection to the external MQTT broker requires TLS encryption.
- CA File
Only available for TLS connections. Upload the CA certificate of the external MQTT broker.
- Certificate File
Only available for TLS connections. Upload the certificate of the external MQTT broker.
- Key File
Only available for TLS connections. Upload the private key of the external MQTT broker.
- Username
Enter the username to authenticate to the external MQTT broker.
- Password
Enter the password to authenticate to the external MQTT broker.
- Test Connection
Publishes an MQTT message “test” with the topic “any”.
After you’ve set up a new broker connection, you’ll have to assign it to your MQTT device under Broker Connection.
Broker connections can be in any of the following states:
State |
Description |
|---|---|
Unused |
The broker connection is currently not assigned to any device. |
Disabled |
The broker connection was disabled by the user. |
Connecting |
The system is currently trying to connect to the broker. |
Connected |
The system is connected to the broker. |
Restrictions and limitations
MQTT communication is subject to some restrictions. MQTT clients are limited to posting messages to a single custom MQTT device, and the data transfer rate is limited to 128 KB per minute. Once this rate is exceeded, messages will be dropped. If you experience dropped messages, try to decrease the size of the payload or reduce the frequency of the messages.
Internal brokers are limited to 20 messages per second per device, whereas external brokers are limited to 20 messages per second per broker connection.
Note that in order to receive messages from WAGO controllers with EDM or BC, respectively (e.g. Compact Controller, Edge Controller or PFC), you’ll need to integrate the WAGO controller accordingly. Is is not possible to receive these types of messages with a custom MQTT device and a custom decoder.
Location
- Address
The location address of the device. If you fill in this field, the device will be displayed on the map widget and in the map navigation.
- GPS
If the address input above is insufficient, you can also specify the location of the device using GPS coordinates.
Device access
Here you configure which user groups are allowed to access the device and its data points. If users should see data points or their recordings or live values, they need to have access to the respective device on which these data points are located.
To add a user group, click on Add User Group and select a user group from the list. All users in that user group will get access to the device. To remove a user group, click on Remove next to the corresponding user group.
Granting access to a device also enables access to the device via our public API.
Note that users with the action right “Show all devices” can see all devices of the client, regardless of their respective user groups.
Receive and parse MQTT messages
Unlike IoT devices from Avelon, custom MQTT devices do not come with any preconfigured data points, and they need a custom script to parses incoming messages.
The list of available data points and the script to decode messages for a specific MQTT device have to be defined in an IoT profile. Once you’ve created an IoT profile, it can be assigned to any custom MQTT device in order to create the data points and assign the parsing script.
Please read the chapter IoT profiles for instructions on how to create an IoT profile and assign it to your custom MQTT device.
Alerting
- Enable Watchdog
Activate the watchdog to be notified if the device does not report in for a longer period of time. This allows you to react in time in the event of a device defect or insufficient transmission power. Select the desired alarm chain from the dropdown.
Warning
Watchdog alarm tickets cannot be closed until the device sends an acknowledgment that the alarm is gone and that the connection with the server is reestablished. As a result, when trying to close a ticket prior to device acknowledgment, the following error message is displayed: “This ticket cannot be closed. The alarm must be acknowledged by the device first”.
On the Alerting tab in device management you can configure how the system should handle alarms.

Manage alerting
Create a new alerting by clicking Add Alerting on the left side above the sidebar or edit an existing alerting by selecting it in the sidebar.
When creating a new alerting, you must first select the type of alerting. This determines the basic behavior of the alerting and cannot be changed later. You can configure any number of alertings on one MQTT device.
The available alarm types are:
- MQTT Alarm
The system checks the alarm condition for each data point at regular intervals and triggers an alarm if necessary. For more information, see MQTT alarm below.
- Catch Unhandled Alarms
This option can be used as a temporary solution for alertings that are not caught by any of the alarm types described above. However, this is purely a safety net for testing purposes. In general, it is recommended that alarm handling be implemented using one of the other procedures described above.
Alarmed data points
Subsequently specify which data points are to be used for the alerting by dragging them from the right sidebar to the lower part of the main view. All data points assigned to the alerting are listed in the main view under Data Points. You can also assign multiple data points of the same data type simultaneously by first selecting them in the sidebar while holding down the Ctrl or Shift key.
To remove data points from an alerting, move the mouse over them and then click Remove Data Point on the right-hand side. Alarms of the data point that have already been triggered are not deleted, but new alarms are no longer triggered for this data point.
Settings
The following setting options are possible for an alerting and refer to all data points assigned to the alerting:
- Name
Give the alerting a suitable name.
- Alarm Chain
Select the alarm chain to be escalated in the event of an alarm to notify a stand-by service or technicians. Also see the chapter Alarm Chains.
The following options depend on the selected alarm type and are not available for all types:
- Notify current alarm chain user by email when the device acknowledges the alarm as “gone”
With this option you can specify whether device acknowledgments should be sent by email to the recipients of the alarm message. This setting overrides the option with the same name on the general notification settings.
- Tickets can only be closed when alarm is gone
Restricts users to closing tickets only when they have been previously marked as “Gone” by the system, i.e. if the system received a message where the alarm condition was no longer present.
- Conditional alarm suppression
Alarm suppression allows you to prevent alarms from being issued under certain conditions. Set the condition by first dragging a data point from the right sidebar to the yellow note field, then selecting the data point property to be tested from the list and configuring a value comparison, such as
<LiveValue> ≥ 100.- Set data point value on user acknowledgment
This option allows an alarm on the controller to be turned off as soon as the alarm ticket is acknowledged by a user in the alarm chain. A dedicated data point is assigned to the alarm, for which you can set specific values for acknowledgment and reset. Once the alarm is acknowledged, the value of this data point will be set to the acknowledgment value and then it will be reset to the reset value after one second. Information such as the fact that a value was written, the actual acknowledgment value, system name and name of the data point will be added in the ticket history, for reference.
- Enable tag for alarm messages
Activate this option and then enter any text in the Alerting Tag field. You can then use this text in the alarm message template so that it is sent to the recipient by email or SMS message as part of the alarm message in the event of an alarm. This allows several different alarm texts that depend on the alarm condition to be defined for the same data point. To learn how to use the custom tag in alarm messages, see Notifications.
MQTT alarm
- Activate Surveillance
Enable this option to activate the alerting. If you disable it, no alarms will be triggered.
- Surveillance Mode
- Present Value
The present value is used to determine the alarm state.
- Upper Limit
An alarm will be triggered when the present value exceeds the upper limit.
- Lower Limit
An alarm will be triggered when the present value falls below the lower limit.
- Delay
If the alarm condition is met, wait for this amount of seconds before triggering an alarm. Only if the alarm condition is still present after this delay, the alarm will be triggered. This must be a multiple of the checking interval (or 0, if no delay is required).
Setting an alarm
You can add an alarm for any of the data points assigned to a custom MQTT device. The available data points are displayed on the Data Points card. To add an alarm for one of the data points, proceed as follows:
Select the data point by clicking on Go to Data Point on the right hand side.
Under Alerting, define an upper and/or lower alarm limit value.
Select the alarm chain to be invoked in the event of the alarm. For information on how to set up alarm chains, see Manage alarm chains.
With the value Deadband for gone alarms relative to the limits you can also set the difference relative to the alarm limit value as of which any alarm that occurs should automatically be marked as “gone” by the system. For more information on how to edit data points, see Edit data points.
Save your changes by clicking on Save at the top right in the toolbar.
Warning
If you only have a free Heads-up! license on your device, only alarm chains with one user and email notification can be selected. In order to add more users to the alarm chain and to receive alarm notifications via SMS also, a paid Heads-up! license needs to be purchased.
Gateways
The LoRaWAN gateways with which the sensor was recently in contact are displayed on the map. For a gateway to be displayed correctly, the operator of the gateway must have stored the correct GPS coordinates on the device.
Download labels
You can download or print the labels, which are factory affixed to the outside of the case, at any time. Different labels are available depending on the device type. The front label contains the QR code needed to use the device in our IoT app as well as a marker used in connection with its augmented reality function. The back label contains technical information about the sensor, such as the serial number or device EUI.
You can download or print the two labels by clicking on More at the top right, then on Front Label or Back Label respectively, and then on either Download or Print.
Schematic link
It is possible to jump directly from the IoT app, which you can open via the QR code of one of our IoT devices, to a specific schematic, for example to control the parameters of the air conditioning system. You can specify which schematic is to be opened under Schematic Link.
If you also select a data point filter, the system will try to dynamically fill the data points on the schematic using this data point filter. However, this only works if the system names in the shapes used are set in such a way that a unique assignment of data points from the selected data point filter to the shape is possible.
As soon as the link is set up, a corresponding link to the schematic appears on the IoT app.
Licenses
See Licenses.