Alarm chains
Alarm chains are used to determine which persons are to be notified when and in what manner in the event of an alarm or an incoming user report. They are called chains because in the event of an alarm, they are run through step by step. Each user in an alarm chain has a certain amount of time before the next user is notified. Alarm chains can be configured and also interlinked in a variety of ways.
You can access the alarm chain management by clicking on Users in the user menu at the top right and then selecting the tab Alarm Chains.
In the left sidebar, either select an existing alarm chain to edit it, or click Add above the sidebar to create a new alarm chain. Alarm chains are available system-wide within the client account and can be used in all alertings regardless of the source of the fault.
At the top, you can give the alarm chain a meaningful name. With a click on Edit Translations you can directly enter the name for all possible languages.
Define alarm chain user
First add a new user to the alarm chain by selecting a user in the Add User field. Alternatively, you can add a complete user group. This has the side effect that the user list in the alarm chain is automatically updated if the user group is subsequently changed.
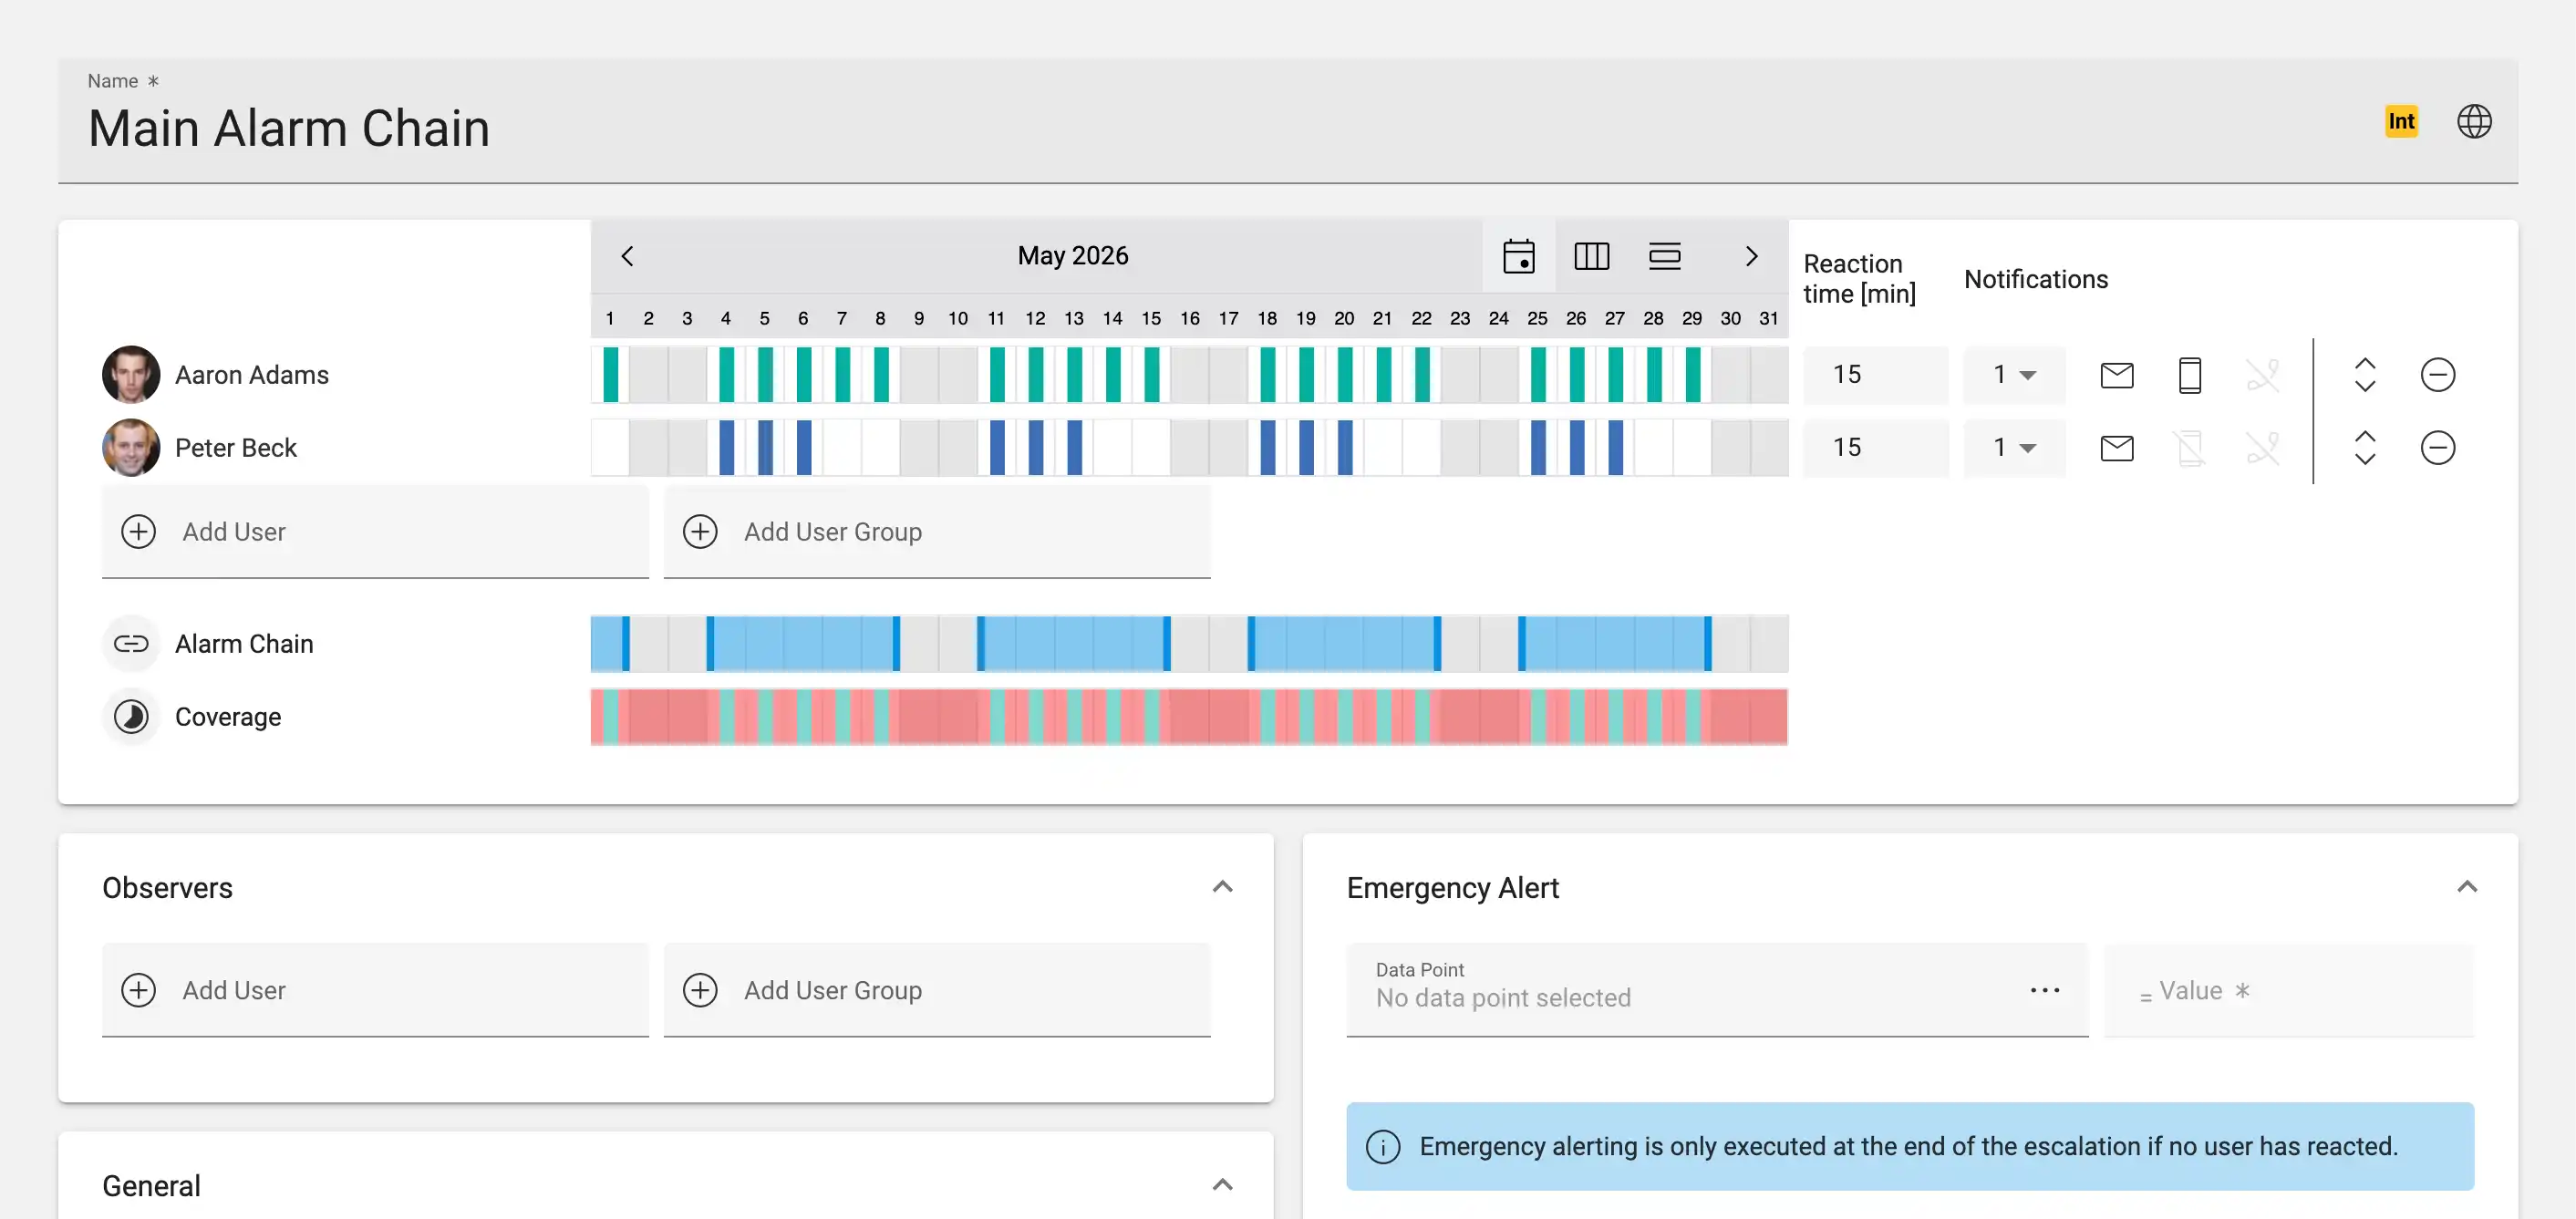
A separate entry in the alarm chain is now created for each user and it can be further configured.
- Reaction time (in minutes)
If the user has been notified and does not respond, this time is waited out before the next user in the chain is alerted.
- Number of notifications
The user is notified the selected number of times repeatedly before the next user in the chain is alerted. The previously set reaction time is also taken into account here.
- Notify by email
The user receives an email notification.
- Notify by text
The user receives a text notification on their mobile phone.
- Notify by phone call
The user receives a phone call with the alarm message being read out.
On Alcedo Inhouse systems, a SIP server has to be configured for the phone call notification to work.
Note
Users who have the Avelon Heads-up! app installed will always receive an alarm via the app when they are on call.
Warning
For users who don’t have an email address or a valid mobile number set in their user account, a warning icon appears instead of the notification options. Make sure that the affected users have configured at least one email address or mobile number so that they can receive alerts. Alternatively, you can install the Avelon Heads-up! app on your mobile phone.
Emails, text messages and push notifications are sent by the system to the corresponding 3rd-party network service provider for delivery to the user. As soon as the 3rd-party service accepts the message, the system considers the message as being sent. However, it is important to understand that this does not necessarily mean that the message was received by the user. Network availability of the 3rd-party service provider and the user himself may affect the delivery of the message.
In the case of push notifications, you can get more information about their delivery status in the section History of the ticket details (e.g. on the Ticket list panel or on the Ticket list widget). If a device has confirmed the receipt of a push notification, it will say so in the history of the ticket. The log entry will also state whether the notification was displayed to the user (on Android devices) or whether the user has tapped on the notification banner to open the ticket in the app (on iOS devices). The difference between the two platforms has to do with technical limitations of the respective platform.
Note
For time-critical alarms, we recommend that you add multiple users to the alarm chain and set the reaction time of everyone to 0 minutes, so that all users will be notified simultaneously.
Changing the order of users
You can change the order of users by dragging them up or down with the mouse. The best way to do this is to use the Change Order icon. This appears on the right side of a line when you move the mouse pointer over a user.
Remove user
Remove users from the alarm chain by moving the mouse pointer over them and then clicking on Remove on the right-hand side.
Attendances
You can edit the attendances of users in the middle of the screen. This is the time during which users should actively take care of alarms and receive alarm notifications. Users are not notified outside of their attendances. Instead, the next user in the alarm chain is automatically informed.
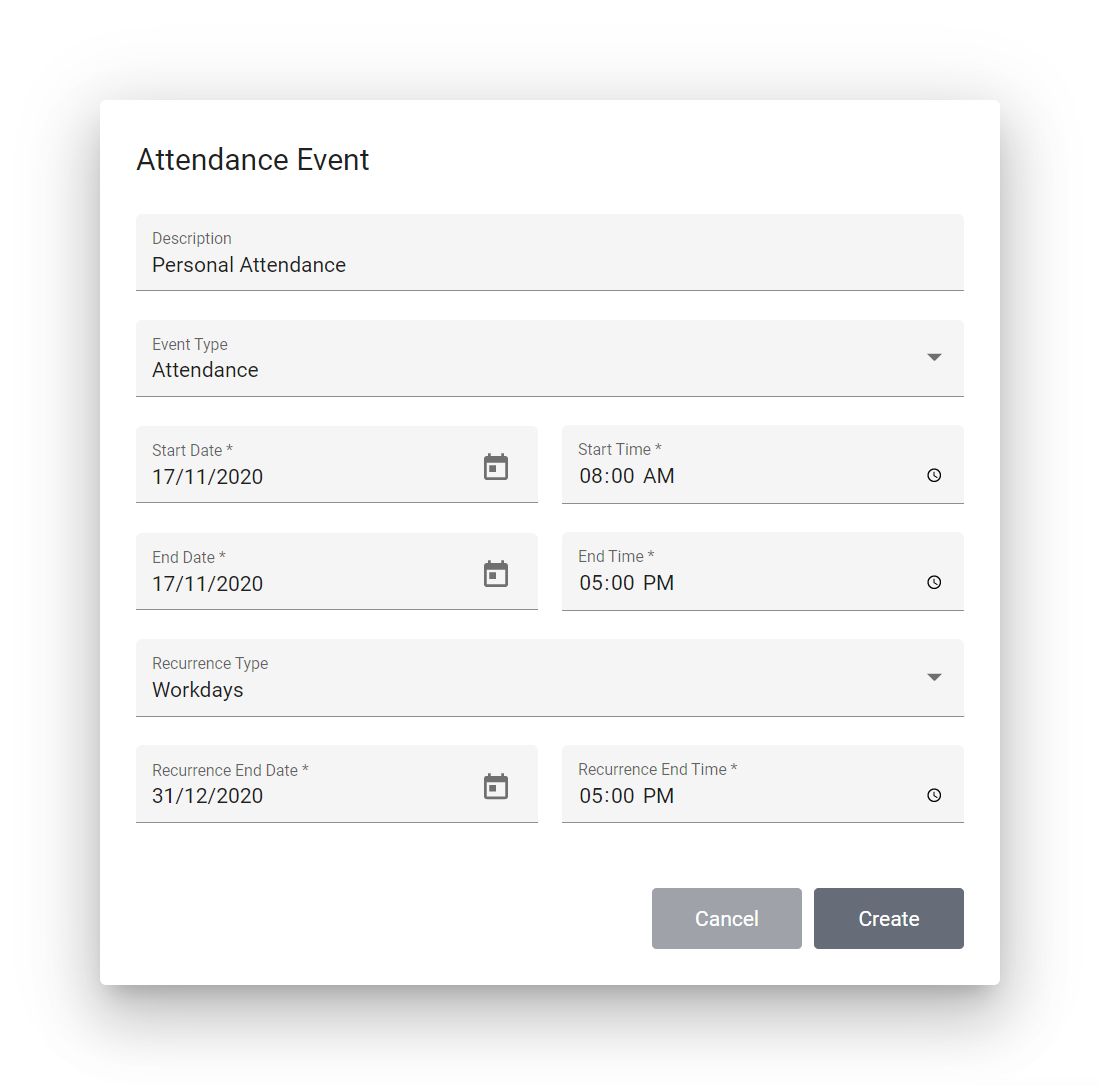
The attendance dialog.
Edit a user’s availability by clicking on an existing attendance (indicated by a colored bar), or by clicking on a free space to define a new attendance.
- Description
Give the attendance a name so that you can identify it more easily later.
- Type
Select Attendance to define an attendance. Absence, on the other hand, means that any attendance for the specified time period is ignored.
- Start time
Start time of the attendance.
- End time
End time of the attendance. Make sure that for repetitions, the day is the same as for the start time (see examples below).
- Recurrence Type
You can have the availability time repeated as often as you wish:
No recurrence
Daily (Monday to Sunday)
Workdays (Monday to Friday)
Weekly
Biweekly
Every 3 Weeks
Every 4 Weeks
- End of repeat
The time when the repetition should take effect for the last time.
Examples
Example |
Start Time |
End Time |
Recurrence Type |
Recurrence End |
|---|---|---|---|---|
Daily recurrence during business hours |
01/01/2016 08:00:00 |
01/01/2016 17:00:00 |
Workdays |
12/31/2018 17:00:00 |
Permanent availability around the clock |
01/01/2016 00:00:00 |
12/31/2018 23:59:59 |
None |
- |
2-week vacation |
08/15/2016 00:00:00 |
08/28/2016 23:59:59 |
None |
- |
Alarm chain availability
The alarm chain availability determines at which times an alarm chain is always active and sends alarms, regardless of the attendance of individual users. Alarm notifications are only sent when an alarm chain is active or in attendance respectively. In principle, it makes sense to strive for permanent availability. Interruptions in the alarm chain availability should be intercepted by other alarm chains, for example via a stand-by service or with mutually complementary alarm chains (e.g. alarm chains for different alarm priorities), in order to avoid gaps in notification.
Note
Setting up an alarm chain availability allows you to create alarm chains for different alarm priorities. For example, you can define an alarm chain that is only active on workdays (priority 2) and another that also notifies on weekends (priority 1). Although this means that the alarm is sent to different users on different days of the week, no special settings need to be made for the attendance of the users.
Warning
Note that alarm notification only takes place as long as the attendance of users overlap with the alarm chain availability. Periods in which this is ensured are displayed as a green bar on the row Coverage.
Observers
Under Observers, you can define users who act as observers. These are notified immediately when the alarm chain is invoked. However, they are not part of the chain and do not usually have to react to the alarm message.
If you add a user group, all users of that group will be treated as observers. It is also possible to assign users from other clients as observers.
Observers have the option of receiving a final report by email when the ticket associated with the incident is closed. This report contains a complete log, including the initial message as well as all events of the alarm chain and comments of the users involved.
- Notify by email
The observer receives an email notification.
- Notify by text
The observer receives a notification by text message on his mobile phone.
- Notify by phone call
The observer receives a phone call with the alarm message being read out.
On Alcedo Inhouse systems, a SIP server has to be configured for the phone call notification to work.
- Send report
The observer receives an alarm report by email when the ticket is closed.
Special treatment for users who are simultaneously registered in the alarm escalation and as observers
Warning
If a person is both part of the alarm escalation and an observer of the same alarm chain, special notification rules apply as listed below. These users are marked with a small / icon respectively.
Users are not notified immediately even though they are observers.
As soon as it is the user’s turn according to the alarm chain, he is notified according to the notification rule under General if he is in attendance. However, if the user is not in attendance at that point in time, he is notified according to the notification rule under Observers and the escalation continues immediately with the next user.
Settings
Each alarm chain can be configured individually as to how it should behave in specific situations.
General
- Color
You can assign a different color to each alarm chain so that you can recognize it later at a glance in the Ticket List widget. However, the option Show Alarm Chain Colors must be activated in the widget for this. Click on the color field and select the desired color.
- Repeat alarm chain
By default, an alarm chain is stopped when it has reached the end, even if no user has responded to the alarm notification. Enable this option to repeat the alarm chain as long as no user responds to the notification.
Note
An alarm chain is repeated a maximum of 5 times.
Warning
An alarm chain cannot be repeated if a subsequent alarm chain is configured on the card Subsequent Alarm Chain below.
- Close ticket at end of the alarm chain
Tickets are closed automatically when the end of the alarm chain has been reached.
Warning
This option is only useful if no subsequent chain has been configured on the card Subsequent Alarm Chain below. If you want to use subsequent chains, you should activate this option only on the very last subsequent chain.
- Wait while the alarm chain is not in attendance
If an alarm chain is not in attendance, it waits by default until the next attendance period and then continues automatically. This makes it possible to temporarily suspend an alarm (e.g. overnight) and thus postpone the notification until a specified point in time.
Note
This option is of interest only in connection with alarm chains whose attendance has interruptions. The option has no effect on alarm chains with continuous attendance.
Warning
This option can only be disabled if a subsequent chain is configured. In this case, the subsequent chain is invoked immediately if the current alarm chain is not in attendance.
- Send SMS only when push notification fail
Text messages are only sent if the push notification fails. The prerequisite for this function is that users have the Avelon Heads-up! app installed on their smartphone.
Subsequent alarm chain
A subsequent chain can be configured for each alarm chain that starts as soon as the end of the current alarm chain has been reached. This has the advantage that you can put together an alarm escalation consisting of several small alarm chains and can manage these individually. This is particularly useful when alarms are to be handled by several teams made up of different people.
By default, the Default Subsequent Alarm Chain is executed at the end of your alarm chain. However, you can also configure a condition on a specific data point and have one of two alarm chains executed based on this condition. To define a conditional subsequent alarm chain, click on Add Conditional Subsequent Chain. Select a data point and define the data point condition, then select the two alarm chains.
As soon as the end of the current alarm chain is reached, the data point condition is checked. If the condition is evaluated to true, the Subsequent Alarm Chain is started. Otherwise, the Default Subsequent Alarm Chain below will be triggered.
If you want to remove the alarm chain condition, click on Remove Conditional Subsequent Alarm Chain.
Note
Since alarm chains from external service providers can also be selected as subsequent alarm chains, it is possible to configure an escalation across customers or clients. External alarm chains can be identified by the small arrow symbol . To display the alarm chains of a service provider, the service provider must first be integrated.
Emergency alert
An emergency alert is invoked if no user of the alarm chain has reacted within the set time. In this case, a target data point can be set to any value in order to invoke a second alerting, if necessary.
To set up an emergency alert, you must first select a suitable data point. To do this, click on Select a Data Point. In the following dialog, drag the desired data point onto the blue area and confirm with OK.
In the Value field, enter the value to which this data point is to be set if no user has reacted to the alarm chain.
If a repetition of the alarm chain or a subsequent chain is configured, you can use the Escalation delay after emergency alerting field to specify how long the system should wait until the next alarm chain is escalated.
Delayed evaluation
A ticket can invoke an action automatically, depending on its status by means of the delayed evaluation. For example, this function can be used to automatically close a ticket when an acknowledgment is received, or to restart the escalation if acknowledgments and fault reports alternate several times within a short time and you want to be notified if the alarm is still pending after a certain time.
- Trigger
Select the event that should trigger a delayed evaluation. You can choose between the following events:
New alarm ticket
Acknowledgment from device
The delayed evaluation will only be triggered once per ticket, even if the event occurs multiple times.
- Delay
Enter the time you want to elapse between the actual event and the evaluation.
- Action if still in alarm
Select the action that is to be performed if the ticket is in the alarm state after the delay time has expired, i.e. if it has not yet been acknowledged or closed:
(no action)
Restart alarm escalation
- Action if acknowledged
Select the action that is to be executed if the ticket is in the acknowledged state after the delay time has expired:
(no action)
Close ticket
Alertings
All alertings in which the current alarm chain is used are listed here. For more information on alerting, see Alerting.