Set up the meter network
Click on Edit in the toolbar at the top right to start editing the network. In contrast to view mode where all shapes are displayed at once, the meter network can actually be based on multiple pages to make navigation easier during editing. We recommend you create a separate page for each major cost center and splitter to keep things organized.
Pages can be managed in the sidebar at the far left. Select an existing page to open it, or click on More ▸ Add at the top of the sidebar to create a new one.
In order to edit the actual network, you need to open the Library panel at the top left of the main area. The library sidebar contains two tabs:
- Data Points
This panel contains all data points of your project. Select a data point filter at the top and then expand the appropriate data type in the list. You can then drag & drop your data points from the sidebar to the main area. In general, you should only place data points that represent meters in your building (e.g. water meters or electricity meters).
- Network Objects
With network objects you can build your network. There are three different types of objects available:
- Cost Center
Cost centers are accounting units within an organization to track expenses. In the context of the ancillary cost settlement, cost centers can be water and power supply, heating, maintenance or other services.
- Splitter
Splitters can be used to group areas, meters or even other splitters into larger entities that can help you organize the network and connections between individual shapes more easily.
- Area
Areas represent apartments or other kinds of rentable or common spaces in your building. Tenants need to be assigned to areas in order to be taken into account in the ancillary cost settlement.
Use the buttons at the top of the sidebar to add, edit or delete any of these objects. To place an object on the page, simply drag it from the sidebar to the page. If an object is already placed on any page, it will be marked with a • icon on the right.
Every network object can only be placed on one specific page. If it is dropped on another page, it will appear semi-transparent, indicating that this is merely a reference to the actual shape on the other page.
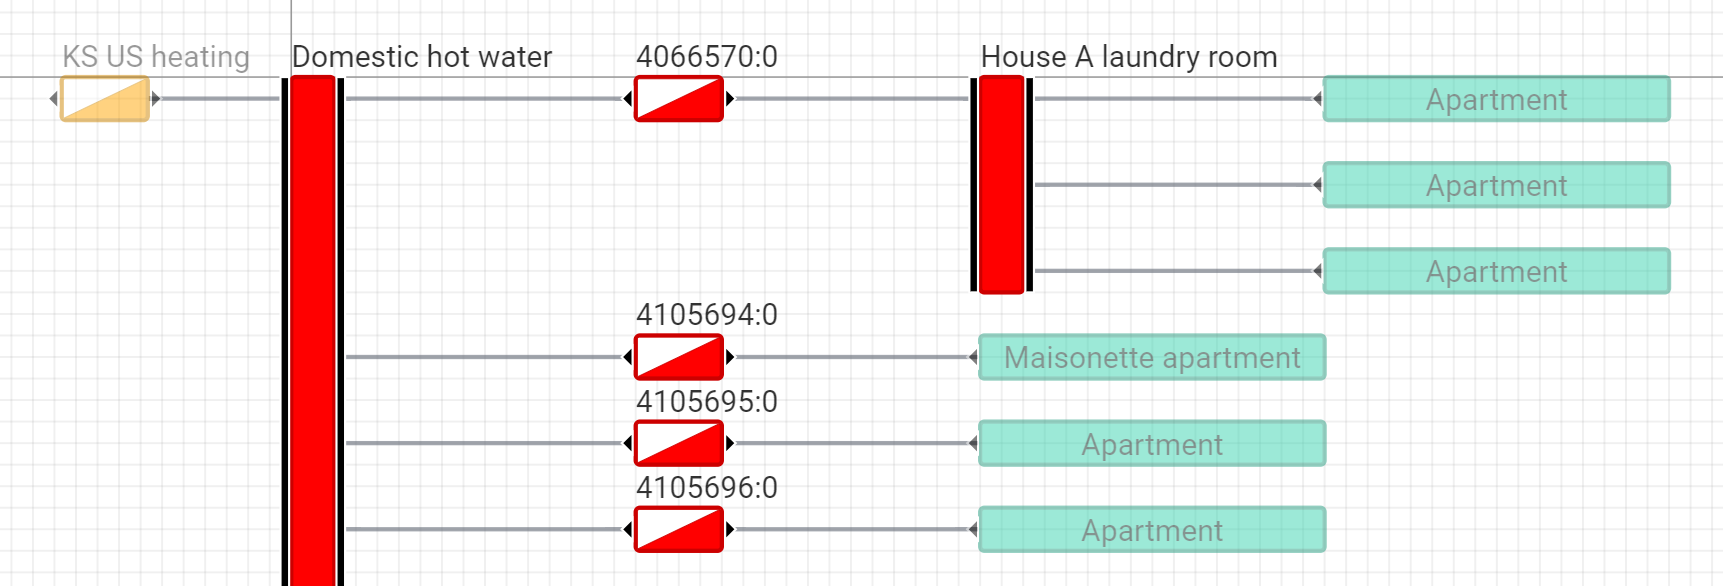

Shapes can be connected by dragging one of the black triangles of a shape over one of another shape. Note that a left-pointing triangle always has to be connected to a right-pointing one.
Splitters have black areas on both sides instead of the black triangles because they can be connected to several other shapes.
Place your cost centers at the far left of the meter network, and areas at the far right, and connect them to the corresponding meters and splitters in between.
Properties
If you select a shape in edit mode and open the Properties panel on the right side, you can edit its properties directly in the sidebar.
- Cost Center
- Name
Name of the cost center. This name is displayed next to the shape by default. If you want a different label to be displayed instead of the name, you can override it with Label.
- Accuracy
The number of decimal places that should be displayed for this object on the media flow.
- Currency
The currency in which costs are accounted on this cost center.
- ERP ID
The identifier of this object in your ERP (enterprise resource planning) software.
- Medium Type
The type of the medium that is billed on this cost center.
- Unit
The unit of this cost center, as it should be displayed on the ancillary cost settlement.
- Splitter
- Name
Name of the splitter. This name is displayed next to the shape by default. If you want a different label to be displayed instead of the name, you can override it with Label.
- Accuracy
The number of decimal places that should be displayed for this object on the media flow.
- Area Size
The total area of all subordinate areas in m². By default, the sum of all connected area shapes is added up automatically in the calculation. If, however, you want to override this value with a different value, you can enter the new size here.
- ERP ID
The identifier of this object in your ERP (enterprise resource planning) software. Ony available on splitters with Type set to Collective Cost Center.
- Type
The type of splitter.
- Area Splitter
This splitter represents multiple combined areas. Use area splitters if multiple areas in the building blong to the same logical space (e.g. rooms in an apartment or office building).
- Consumption Splitter
This splitter represents the cumulative consumption of several meters. Use consumption splitters if the cumulative consumption of mulitple meters should be listed as a single meter in the ancillary cost settlement.
- Collective Cost Center
This splitter represents a confluence of different media, a change of medium, or a change of the distribution key (fixed vs. variable costs). Use collective cost centers if one or several media need to be converted into another medium, or if you want to change the ratio between fixed and variable costs. For example, in case of a heating system, a collective cost center “Warm Water” can be used to combine the media “Cold Water” and “Electric” (or “Gas”), or you can convert “Electric” directly to “Warm Water”. For more information about setting the distribution key, see Fixed Cost Share below.
- Fixed Cost Share
Ony available on cost centers and splitters with Type set to Collective Cost Center. If you want to separate values into fixed and variable costs, enter the share of fixed costs into this field (in percent). The variable cost will automatically be set to \(variable = 100\% - fixed\). Fixed costs are distributed according to the area size, variable costs according to meter consumption, connection weights or area size, respectively (the first available in this order). Also see Distribution key.
- ERP ID of Cost Center for Fixed/Variable Consumption Costs
Only available on splitters with Type set to Collective Cost Center. In these two fields you can enter the identifiers of the cost centers for both fixed and variable consumption costs according to your ERP (enterprise resource planning) software.
- Medium Type
The type of the medium that flows through this splitter. For example, if a splitter combines multiple electricity meters, set the medium type of the splitter to Electric.
(Undefined)
Neutral
Compressed Air
Gas
Acid
Base
Burning Liquid
Cold Water
Cooling Brine
Cooling Gas
Cooling Water
Electric
Heating Condensate
Heating Water
Hot Water 100 °C
Steam Heating
Warm Water
Waste Water
- Unit
The unit of this cost center, as it should be displayed on the ancillary cost settlement.
- Area
- Name
Name of the area. This name is displayed next to the shape by default. If you want a different label to be displayed instead of the name, you can override it with Label.
- Area Size
The size of the area in m².
- Rooms
The number of rooms this area comprises.
- ERP ID
The identifier of this object in your ERP (enterprise resource planning) software.
- Type
The type of area.
Common Area: Area used by multiple parties.
Rentable Area: Area rented by a specific party.
Distribution key
The distribution key defines the ratio between fixed and variable costs. By default, all costs are considered variable. If you want to change the distribution key, you can set it in the properties sidebar of a collective cost center (i.e. a splitter with type Collective Cost Center) by setting the field Fixed Cost Share to a value between 0 and 100. The ratio is given in percent, so 0% means no fixed costs, while 100% means no variable costs. The fixed costs are distributed based on the area size, while the variable costs are distributed based on the effective meter values.
Weight of connections
By default, the amount of a medium flowing through a single connection is determined either by the connected meter or by the size of the connected areas if meters are absent.
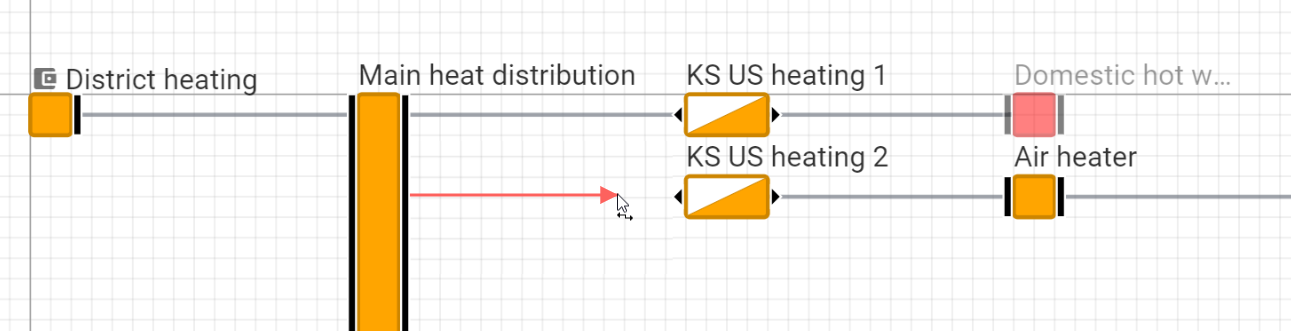
If you want to override the latter (for example, if you want to weight connections based on the number of people that occupy a space, rather than the size of the area), you can change the weight of the connections. Select a connection by clicking on it. The line should appear dashed, and in the Properties panel on the right hand side, you can set a custom Weight.
Note
By default, the weight of connections is not set, in which case it will be calculated automatically based on the meter values or area sizes. To enter a custom weight, select the checkbox Set Weight and enter the appropriate weight. Deselect the checkbox to revert back to the default behavior.
Copy and move shapes between pages
Every network object can only be placed on one specific page. If it is dropped on another page, it will appear semi-transparent, indicating that this is merely a reference to the actual shape on the other page.
Shapes can still be copied and moved between pages though.
Copy shapes
To copy a shape from one page to another, select it, then press Ctrl/⌘ + C to copy it.
Navigate to the target page and press Ctrl/⌘ + V to paste it there.
The pasted shapes will always become references.
Move/cut shapes
If you want to move a shape to a specific page without creating references, select it, then press Ctrl/⌘ + X to cut it.
Navigate to the target page and press Ctrl/⌘ + V to move it there.
The shape will now appear as a regular shape on the new page.
However, the shape that was originally cut will still remain in its original place, but turns into a reference.
If you delete a regular shape, the shape and all its connections will be deleted. If you delete a reference shape, only the reference shape and its connections will be deleted. Other instances of the same shape and their connections will still remain intact.
Check configuration
In order to check whether the meter network is complete and free of errors, you can perform an integrity check. Simply open the More menu at the top right and click on Check Configuration.
Any issues related to the meter network or tenancies are then displayed in the Issues tab at the bottom of the page.
Error |
Solution |
|---|---|
Shapes must not be appended to areas. |
Areas must be the last elements in a meter network. Remove any shapes that are connected to the output of areas. |
Meters must have exactly one successive element. |
Connect the output of a meter shape to exactly one other shape (e.g. an area splitter or an area), or remove excess shapes. |
Either all or none of the connections between area splitters and areas must be weighted. |
If any of the connections between area splitters and areas are weighted, all other connections must be weighted, too. Change the weights of these connections. See Weight of connections. |
Meters are not allowed after weighted connections. |
If a connection is weighted, it must not be followed by meters. Either remove the meters or clear the weight of the connections. See Weight of connections. |
Meters must have exactly one preceding element. |
Make sure the input of your meter shape is connected to exactly one other shape (e.g. a splitter). |
Total size of underlying areas is 0. |
Set the size of your areas. Select an area shape and set its Area Size in the Properties panel on the right. |
No start element found. |
Place at least one cost center and connect it to the rest of your network. |
The shape type is not allowed in meter networks. |
Remove the shape from the network. Meter networks only support cost centers, splitters, meters and areas. |
Only cost centers can be at the beginning of a network. |
Meter networks must start with a cost center. Place at least one cost center shape on your network and make sure other types of shapes (i.e. splitters and areas) are connected to the network. |
Meter with invalid medium type. |
Change the medium type of the meter. Select the meter shape by clicking on it, then change its Medium Type in the Properties panel on the right. |
No meter network was found for the selected time interval. |
Either change the displayed time interval with the time selection at the top, or create a new meter network for the current time interval. |
The medium type can only be changed for collective cost centers. |
If you want to set the medium type of a splitter, it must be configured as a collective cost center. Select the splitter shape and change its Type in the Properties panel on the right to Collective Cost Center. |
Losses are bigger than 10%. |
Check if all meters are connected correctly in the network. This issue usually arises if the wrong meters are connected or if meters don’t send correct measurements. |
The outgoing consumption is bigger than the incoming. |
Check if all meters are connected correctly in the network. This issue usually arises if the wrong meters are connected or if meters don’t send correct measurements. The latter might be caused by technical issues, such as faulty meters or damaged conduits. |
No data point is available for this meter. |
The meter doesn’t point to a valid data point. Maybe the data point was deleted. Remove the meter shape and place another data point on the network instead. |
Invalid data type for the meter: Energy or volume expected. |
Only data points with data type Energy or Volume can be used as meters. Remove the meter shape and place another data point on the network instead. |
No measurement value recording is available for this meter. |
Make sure your meters have valid measurements. |
Units of meter and cost center do not match. |
Make sure all meters measuring the same medium as the cost center they’re connected to have the same unit as the cost center (e.g. all |
No matching medium type found in the inputs of the collective cost center. |
Make sure the medium type of the collective cost center is compatible with the medium type of any of its inputs. For example, warm water and cold water are compatible, warm water and electricity are not. |
Keyboard shortcuts
See Keyboard shortcuts.
Consumption-based billing of heating and hot water costs (VHKA)
How to speed up the process of adding areas and tenants to the meter network is described in detail on the following page.