Ticket details
Selecting a ticket from the ticket list displays further details about the ticket.
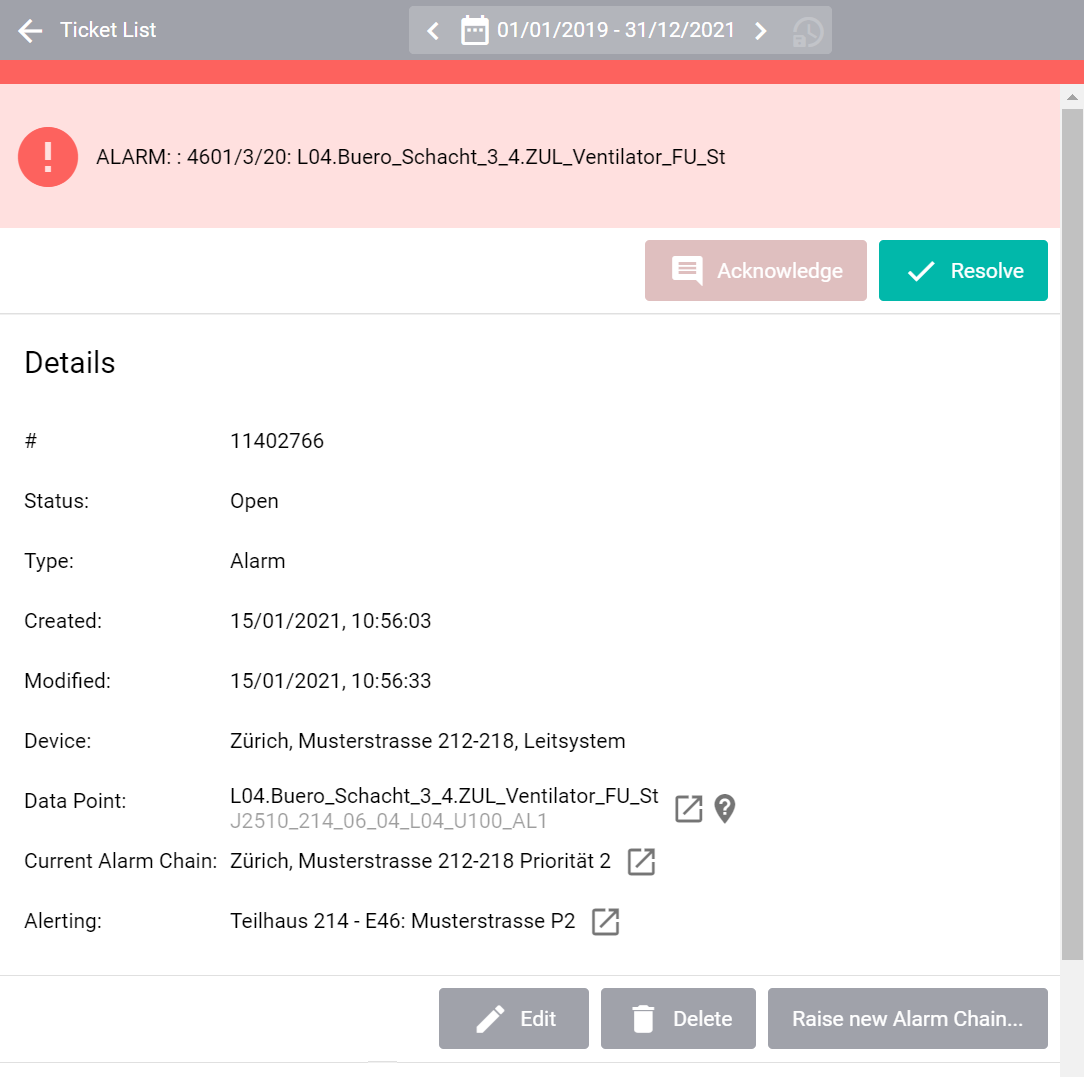
Detailed view of a ticket
- Alarm or event text
The complete alarm or event text is displayed at the top.
- Ticket number
This number uniquely identifies a ticket.
- Status
Current status of the ticket, which can also be recognized by the symbol above or the ticket color.
- Type
Type of ticket.
- Created
Date when the ticket was created.
- Modified
Date when the ticket was modified. Every interaction with a ticket (acknowledgment or closing) and every status update refreshes this date.
- Device
The device associated with the alarm. Only available if the alarm was triggered by a device or data point.
- Data point
The data point associated with the alarm. Only available if the alarm was triggered by a data point.
- Created by
The name of the tenant or user that wrote the ticket. This is only displayed if the ticket was generated by a tenant via Avelon Tenants or by a user.
- Real state
The real estate or real estates to which the ticket refers. For tickets created by tenants or users, this corresponds to the real estate that was assigned to the ticket directly. For alarm tickets created by devices, this corresponds to all real estates that have at least one data point filter assigned which contains the alarm data point. Click on Go to Real Estate to navigate to the first dashboard of that real estate. If there is more than one real estate assigned, you can find the other real estates by clicking on the More button.
- Building
The building or buildings to which the ticket refers. For tickets created by tenants or users, this corresponds to the building that was assigned to the ticket directly. For alarm tickets created by devices, this corresponds to all buildings that have at least one data point filter assigned which contains the alarm data point. Click on Go to Building to navigate to the first dashboard of that building. If there is more than one building assigned, you can find the other buildings by clicking on the More button.
- Current alarm chain
The alarm chain whose users are currently being notified. Click on Go to Alarm Chain to navigate to the configuration page of the alarm chain.
- Due date
The date by which this ticket should be completed.
- Responsible
The name of the responsible person to whom the user report is currently assigned for processing.
- Alerting
The alerting that triggered the alarm. Only available if the alarm was triggered by an alerting. Click on Go to Alerting to navigate to the configuration page of the alerting.
- Alarm instruction
If the administrator has stored an alarm instruction for handling the alarm, this can be displayed here.
- Tags
The tags that are currently assigned to the ticket. Tags can be used to annotate tickets with additional information regarding their lifecycle.
- History
All incidents related to this ticket are logged during the process, for example when a user is notified or the alarm is invoked again. Information about possible misconfigurations is also displayed, for example if users cannot be notified or no alarm chain has been configured at all.
Acknowledge a ticket
Newly arrived tickets usually have to be acknowledged. The responsible technician or service provider thereby confirms that the alarm has been received and is being processed.
The acknowledgment function can also be used to comment on a ticket as work progresses. This makes it easier for others to see what work has already been done. A work log like this can also be helpful if problems occur again.
The alarm is stopped when the ticket is acknowledged. The system now assumes that the problem will be handled. However, if the same alarm occurs again in the meantime, no new ticket is created; instead, a comment is simply added to the already opened ticket.
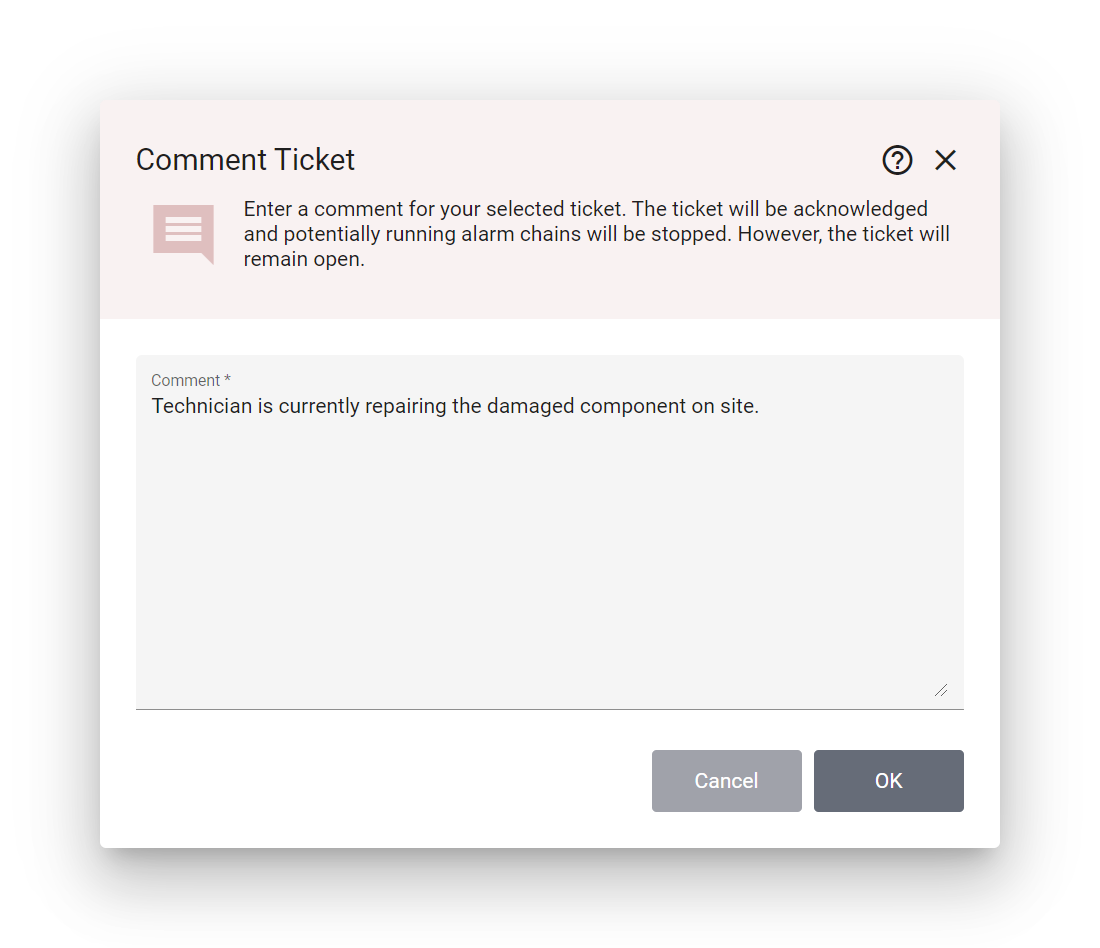
The comment and acknowledgment dialog for tickets
SMS alarm messages
Alarm messages received via SMS can be acknowledged by replying to the SMS with the four-digit code that is shown at the end of the alarm text. Only users who are part of the current alarm chain can acknowledge the alarm via SMS. The alarm can still be acknowledged via the web front-end or the mobile apps.
Close a ticket
When the problem has been resolved, you can close the ticket. Closed tickets are archived and cannot be further processed or commented.
If the ticket is a user report (i.e. created by a tenant), the final comment entered can be automatically sent to the relevant tenant to inform him or her about the closing of the ticket and the measures taken. In this case, activate the option Send comment to writer of the ticket before confirming the dialog with OK. This option is only available for tickets of user report tickets and is not available for alarm tickets invoked by system controllers. The option is also only available if the option Notify the author of a user report via email is activated in the settings (see Notifications).
Warning
If an alarm occurs more than once, a new ticket is only opened when there is no open ticket for the same fault source. If you notice that you no longer receive notifications for certain alarms, please make sure that you have closed all old tickets of the same alarm.
Warning
If a ticket cannot be closed, it means that an acknowledgment from the device is required before the ticket can be closed.
Add or edit a ticket
Depending on the action rights, users can create and edit tickets from the widget.
To edit an existing ticket, select it on the list to go to the ticket details view, then scroll down and click on Edit just below the ticket details.
To create a new ticket, go to the list view and click on Add Ticket in the action bar at the top right above the ticket list. Fill out the form, attach files and tags, then click on OK to create the new ticket.
In the dropdown Responsible User, all users of the current client are displayed. They can be configured in user management.
Tags can only be assigned by authorized users. For more information about ticket tags, see Ticket tags.
Pre-defined text blocks
If you’re frequently writing tickets containing the same message, you can create pre-defined text blocks and use auto-completion to speed up the process. While typing a new message, the system will automatically suggest matching text blocks.
To edit the pre-defined text blocks, click on Manage Text Blocks in the bottom right corner of the Message field. The icon is only displayed for users who are authorized to edit these text blocks, though.
Delete a ticket
This feature is usually only available for administrators. As a rule, tickets should never be deleted, but instead closed normally. The deletion of tickets is only intended for test alarms during commissioning.
Invoke new alarm chain
If the responsibilities of an alarm change during the time the ticket is open, or if another team must also be notified about the ticket, you can manually invoke another alarm chain. This invokes the escalation of the selected alarm chain.
Alarm status of all involved data points
If the alarm was raised by an alerting with the option Device acknowledgment is required to be able to close a ticket enabled, the ticket can only be closed when all related alarm data points have been acknowledged by the device.
If the alarm was raised by a BACnet data point, the corresponding data point and its current alarm status are shown in the table.
If the alarm was raised by a data point that is part of a collective alarm (i.e. an alerting of type Filtered intrinsic alarm), all data points of this collective alarm and their current alarm status are listed in the table, and the data point of the collective alarm and its current alarm status are displayed below the table.
You can navigate to the details of any data point by hovering over it and clicking on Go to Data Point.
Synchronize data points
If, for some reason, the status of the ticket doesn’t reflect the status of the data point or the collective alarm, you can click the Synchronize button. This will check all the displayed data points, and for any data point that is no longer in an alarm state, the system will issue a “Gone” event, and the corresponding ticket will be acknowledged in the process.
To synchronize multiple tickets, go back to the ticket list, click in Select Tickets at the top right of the table, then select the checkbox on the far left of every ticket you want to synchronize. Then click on Synchronize Alarm States at the top right. The button is only available if at least one of the selected tickets is an unclosed alarm ticket.
Note
Before closing a ticket, the data point synchronization is executed automatically if needed.